Knowing when someone can be bothered when working from home is hard, so I created an automated way to clearly show those lovely housemates of yours that it’s fine to interrupt, or to please wait for a little while.
I understand the problem. Show me the setup!
Remember the video of the guy getting interviewed on BBC that had his family come barging in the office while he tried to explain the political climate of Korea?
Of course you remember it. It’s etched into your brain because it could so easily be you. It could be any of us. In fact, virtual meeting “fails” are all the rage now that more and more people are working from home.
And since the moment you were forced to start working from home three months ago, you’ve lived with a quiet, or maybe not-so-quiet fear about your kid bursting into the background during your important client call and asking you to do the finish cleanup work on their latest toilet production.
I have good news for you and the good news is that 1) there’s no need to sweat the uninvited home office guest anymore because it does happen to everyone, and 2) if you have children or roommates or significant others who aren’t complete monsters and who have some respect for social norms, I have a pretty cool way to prevent the accidental Zoom bombing.
There’s a space between the unintended drop-in and business as usual
I’m lucky because I have a dedicated workspace in my home that’s away from the foot traffic of day-to-day life. I’ve also worked from, or in an office with fewer than 5 people, for close to a decade now. Point is I can be easily forgotten by the rest of my family when I’m “at work”.
That was until the pandemic hit and every one of my kids were at home every hour and minute and second of every day. Did I mention they never leave home ever?
Because of our new-found always-togetherness, I felt more of an impulse or a need to be more present for my family. Also, the number of times that Jackie or the boys had a question or needed help with something had a bit of an uptick.
The thing is though, we had already established that “dad’s working”, so they didn’t want to interrupt. And because they didn’t want to interrupt I’d always get these faint taps on the door or a set of eyes peering in just a crack. Both of which are creepy as hell.
We needed a signal! We needed some kind of way for me to indicate that I’m interrupt-able or bother-able, or that I’m neither.
I got to work and with a smart bulb and some basic automation, created a mostly full-proof and automated way to show “I’m in a meeting” or “Please, come in!”
I’m going to show you how you can setup the same thing at home too.
Building An Automated Do Not Disturb system
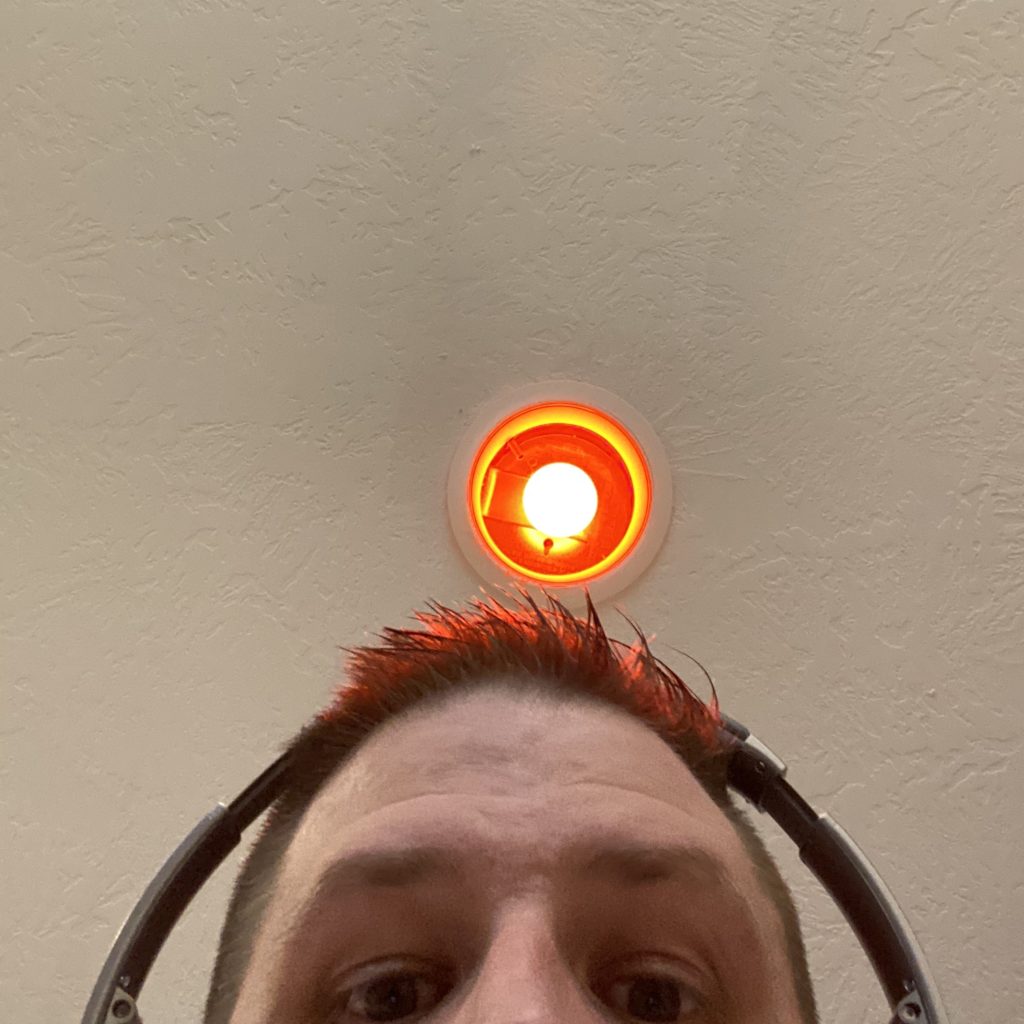
My beautiful in-ceiling Hue light
Stuff You’ll Need
- Philips Hue Smart Bulbs – $45
- Philips Hue Bridge 2nd Gen – $60
- Hue App – Free download after committing your life to the Philips gods.
- Zapier Starter – $19 per month (I use this for tons of other time-saving automations in my life which is why I can justify the cost)
- Google Calendar – You probably have this already
Getting Started with Automated Do Not Disturb
I ended up choosing the Hue family of products because they seemed to have the most integrations with other systems, with the smallest amount of fuss.
I’m the first to admit they’re a little on the pricey side, which is why I went with the bulbs instead of one of their super fancy sconces or decorative light fixtures. Those things get stupid expensive, and simply weren’t worth it for what I was making.
What I set out to build is essentially an automated on/off switch that turned the Hue light on when a meeting was about to start, and turned it back off once the meeting was over.
I’ve been using this setup for a few months now and I’m super happy with how reliable it’s been, although it does have one point of failure that I’ll get into more later.
Step 1: Pick Your Light Location
I spent more time than I’d like to admit figuring out where the best place to put my smart bulb would be. We have recessed (can) lighting outside of my office, so I ended up taking out one of our standard ceiling bulbs and replacing it with the smart bulb.
Putting the bulb in an existing socket kept me from needing to do any kind of home remodeling or fixture hanging, and honestly, it’s the most conspicuous place I could put it. It’s almost impossible to miss if you come by my office.
Find the place where your smart light is going to be noticed by as many housemates as possible, and screw it in.
Step 2: Set Up Your Home Bridge and Connect Your Smart Bulb
I’m not going to get into the specifics of setting up the Hue system, but I mention it here because it’s a necessary step.
Follow along with their setup documentation and instructions within the Hue apps and you’ll be up and running quickly. It took me about 20 minutes to set everything up.
NOTE: The Hue Bridge does need to be plugged in with an ethernet cable to work, so if your home router doesn’t have physical ports, you might need to add a small network switch so the Hub can be plugged in. It doesn’t work wirelessly.
Note 2: You’ll need to create an account on meethue.com for the automation piece. It’s also needed to control any of your smart home devices from a remote location, so a bit of a no-brainer.
Step 3: Connect Hue and Google Calendar to Zapier
The next thing you’ll need to do is create “Triggers” in Zapier between Hue and Google Calendar. Since you’ll probably be adding these apps for the first time, you’ll need to go through a short authorization process to grant access to Zapier so it can see your data in Hue and Calendar.
You’ll create one trigger to turn the light on when your calendar event starts, and another one to turn it off when the event is over. Simple enough, right?
- Comprehensive List of Hue Integrations with Zapier
- Comprehensive List of Google Calendar Integrations with Zapier
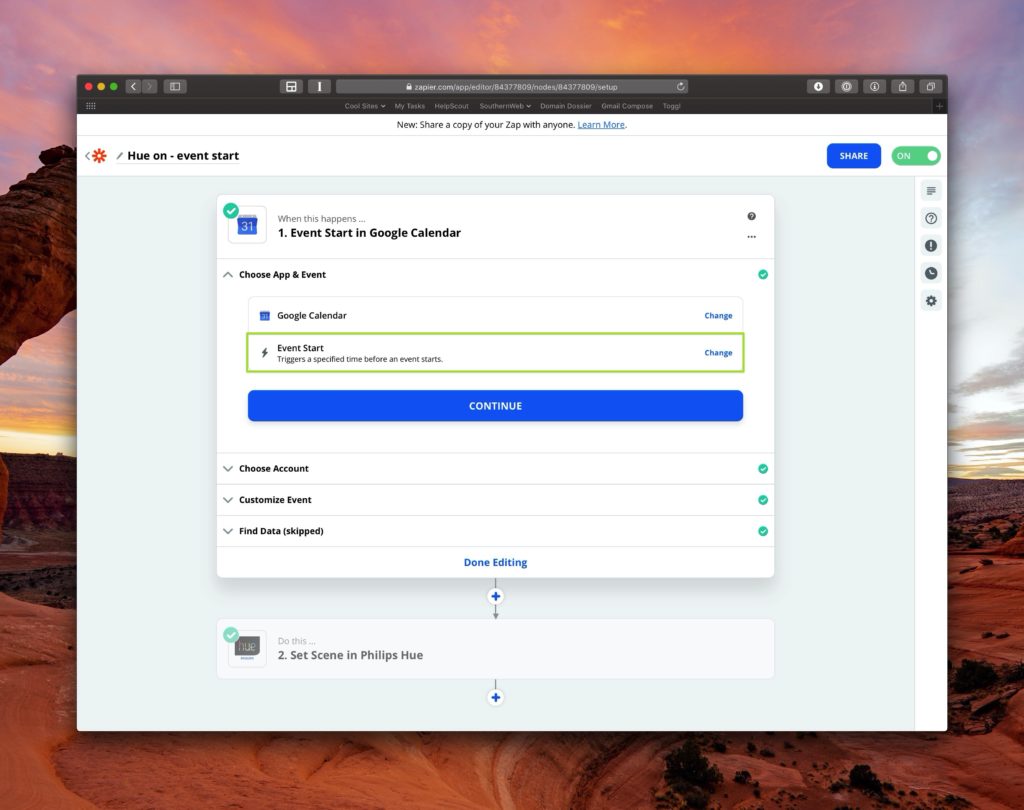
Create a Google Calendar Start Event Trigger
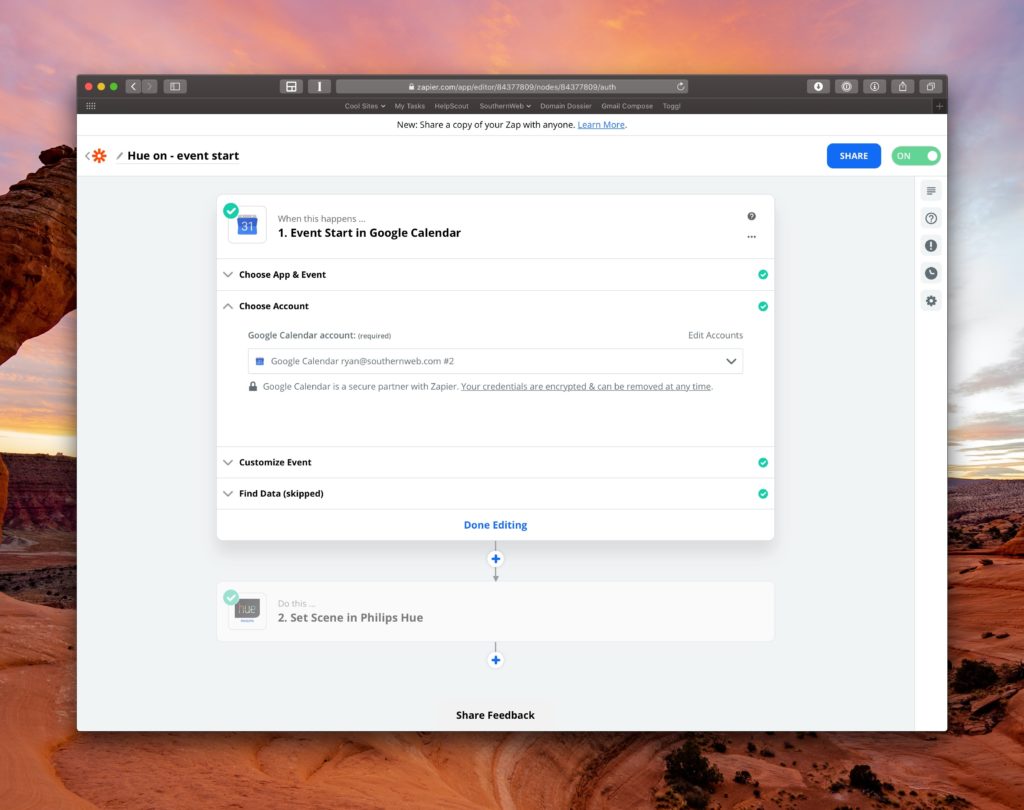
Choose the Calendar You Want to Use
I have my work calendar setup for this one
Customize the Event
After some trial and error, I set the start time at 15 minutes before my my event starts. What I found is that the Zapier automations aren’t super precise, so there were occasional times that the light would come on after the event had already started. A 15 minute buffer mostly resolves that issue.

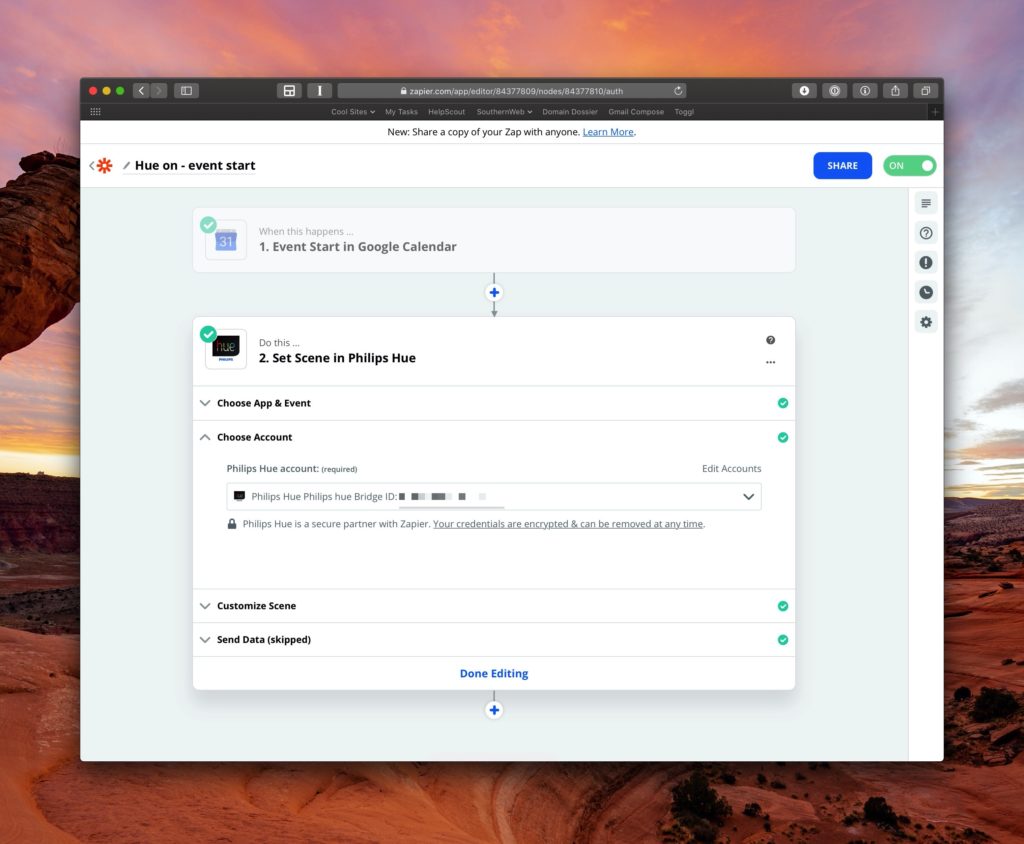
Create a Set Scene Zapier Trigger
Now that you’ve connected Google Calendar and setup that piece of it, you’ll want to create the automation that actually turns the light on.
You want the “Set Scene” event from Philips
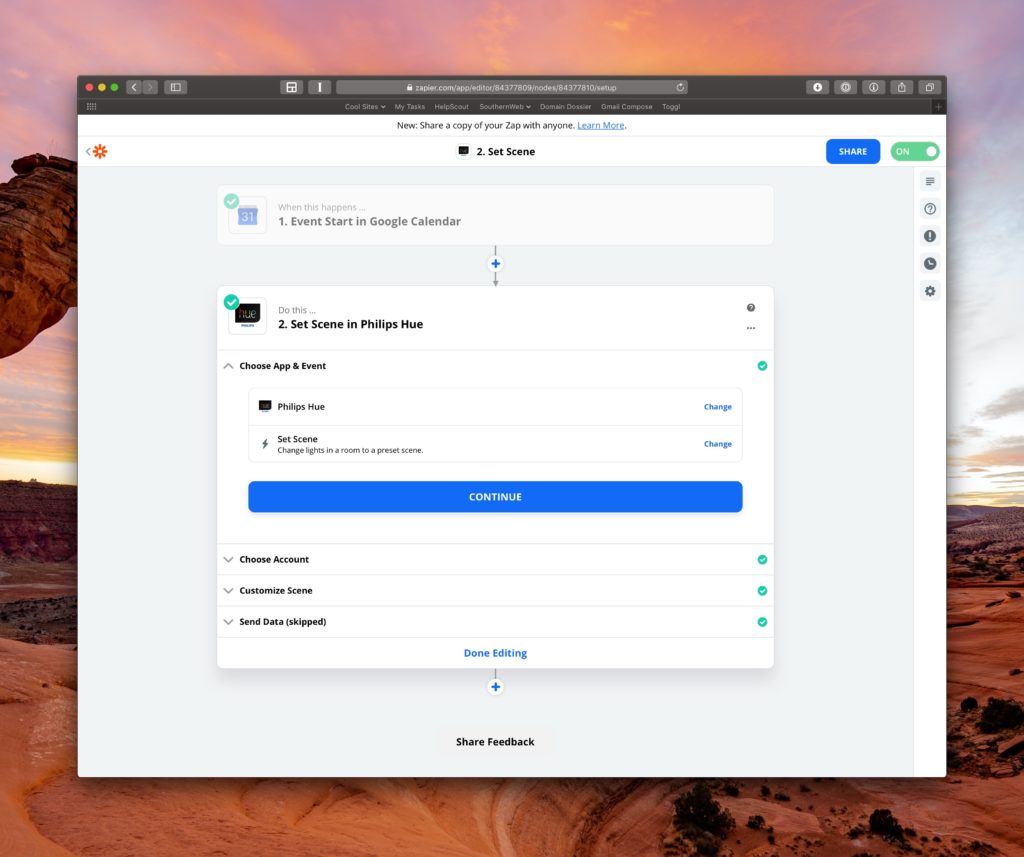
Choose the account you created when setting up your Home Bridge
Customize the Scene
I’ve chosen “Savanna Sunset” because it was easily the most grabbing of all the pre-configured scenes. If you get really nerdy you can create your own custom scenes and really fine tune that color palette. I’m lazy, so I haven’t done that yet.
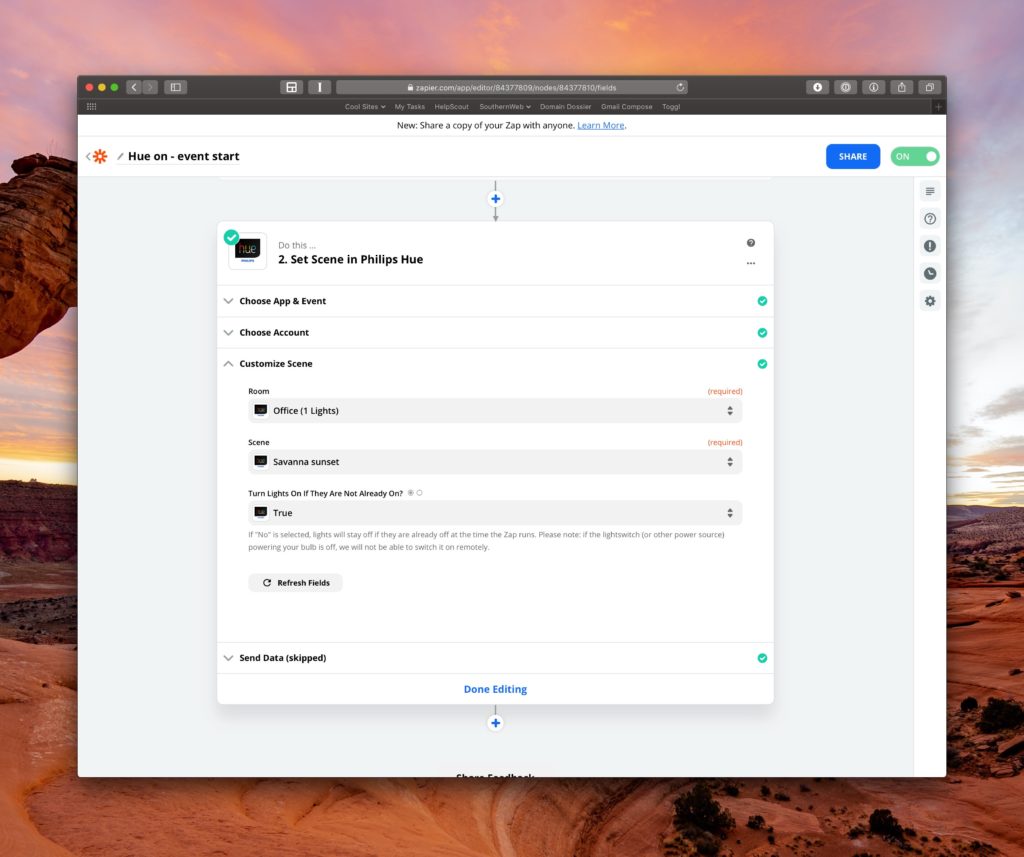
NOTE: There’s some very important, yet understated text in that last screenshot, which is the point of failure I mentioned earlier in this article”
NONE OF THIS WILL NOT WORK IF THE LIGHT SWITCH IS TURNED OFF
Trust me, I know.
In order to save you some setup time you can use the Zaps I created and just put in your own account information.
And that’s it! You’re ready to go. Now whenever your Google Calendar events start and stop, a giant glowing red (or green or blue or yellow) orb will illuminate and signal to your family and loved ones that you’re either in a meeting, or created a fake event to give yourself an extra 30 minutes alone to scream into a pillow.
Whatever you need it for, this automation will be there to help.
P.S. I found an iOS App that solves a similar problem. It isn’t automated, but it lets people share whether or not they can be disturbed with the people they live with. It’s called Oh Bother and looks pretty cool. Check it out.
P.P.S. Thank you to everyone who shared their thoughts and feedback about my last post. I know it was a little bit heavy, but I felt like it needed to be. It created more private conversations than probably anything I’ve written before. I’m glad we can all learn together!
P.P.P.S (or is it P.P.S.S.?) If you run into any issues with your Do Not Disturb setup, feel free to give me a shout and I’ll do my best to help out.