In 2020 I wrote about how I backup my personal computers and I thought it’d be interesting to take a fresh look at what’s changed, what’s stayed the same, and if there are any new ways to increase reliability and redundancy while keeping costs in check.
Why do I care about backups?
It’s probably a good thing I care about backups since I’m literally paid to care about backups. Last I checked our company is processing about 8 Terabytes of website backups every single day. But that’s not why I care about backups.
I care about backups because I’ve seen backups fail and I’ve seen people’s first-hand reactions to those failures.
In the late 90s I did a stint as a Geek Squad team member. I specialized in repairing personal computers. As part of that I role I was tasked with fixing failed hard drives. My least favorite part of that job, including telling people that their significant other had a tendency to visit less-than-savory websites, was telling someone that none of their files were recoverable.
The interesting part is that the first reaction was never emotional. People would typically reason that “well there wasn’t anything that important on the computer”. Then they’d proceed to ask what we had done with the photos, because photos aren’t files, they’re photos.
That’s when, in the softest and gentlest voice possible, I’d have to deliver a nuclear gut punch. “Your photos weren’t recoverable either. Do you keep backups? We can help you transfer the photos back to your computer from your backup drive.”
I hated asking that question. Because I knew the answer before I asked it. Of course they didn’t keep any backups. No one did. It was the 90s, and setting up backups was a full weekend tech project for nerds, not something that “regular people” would or could do.
Every time I delivered that particular set of news I saw everything from total rage to broken hearts. It was then that the fire was lit and I knew I’d do everything I can to protect important files and data. Twenty-five years later that fire is still burning bright, so today I’ll walk you through how I backup my most important data.
A Quick Note on Backup Philosophy
“Two is one and one is none” is a phrase coined by the US Navy Seals about the importance of being prepared at all times. That same way of thinking applies directly to keeping computer backups too. If there aren’t at least two copies of every important file on my computer stored outside of my computer’s internal hard drive, then the files aren’t sufficiently backed up.
For some of my most important files (ie. photos), I keep four or five copies available at any given time, just in case.
How I Backup my Personal Computers and Important Files
I’ll start with a list of the tools I use to keep backups, and then I’ll provide a brief explanation of how I use each one, and how it fits into my overall file protection strategy.
| Product / Service | Backup Job | Cost |
|---|---|---|
| Time Machine | Take periodic snapshots of my home computer and store them on external storage | Free with MacOS |
| Carbon Copy Cloner | Take full snapshots of my computer and store them on different external storage from Time Machine | $50.00 one-time |
| Backblaze | Take full backups of my computers and my external storage and store them on a cloud service | $100 per year per computer |
| iCloud Backups | This is technically for iOS device, but it backs up my settings, Messages, Photos, and App data to a cloud service. | $10 per month for family, although I have the Apple One subscription with everything, so it’s actually $38 per month. |
| iCloud Drive | Backups up files that are stored in iCloud Drive directories to a cloud service. | Included in the Apple One subscription (up to 2TB). |
| Amazon Photos | Backs up photos directly from our iPhones to the Amazon Photos cloud service. | Unlimited photo backups with Amazon Prime, which is $140 per year. |
| Google Photos | Backs up photos directly from our iPhones to the Google Photos cloud service. | 2TB of storage for $100 per year via a Google One subscription. |
| Dropbox | Backs up important files and photos to the Dropbox cloud storage service. | 2TB of storage for $120 per year. |
Outside of these subscriptions, my backup system also requires two external physical disk drives. I’m currently using these Samsung 2TB drives that are $149 each. I really like that they have a slim profile and don’t take up much desk space, but any modern external drive should be fine to get you going.
The investment to get started at this level looks like it’s $350 + roughly $700 per year. That’s not entirely accurate though because with many of these services, the storage is one feature of many that are part of the subscription.
Keep in mind, it’s taken me years to build up to this level. You don’t have to go crazy like I have from the beginning. An inexpensive external drive and a copy of Carbon Copy Cloner are a great place to get started with protecting your memories and other precious files. The important thing is to start.
I’ll also add that I second-guess this level of commitment myself. I don’t do this for all of our computers, only my “main machine.” We have one other family Mac and a Mac Mini that runs our family Plex server. Each of those computers have a very simple setup with Backblaze and one local CCC backup to an external SSD .
The Essentials for Backing Up Your Computer

Before anything else, I recommend signing up for Backblaze. It backs up your whole computer and any directly attached hard drives to the cloud. It works on Windows and Mac, and it’s only $99 per year per computer. You can download backed up files through their web portal, and in the event that you need all of your files in a pinch, they’ll express ship you a USB drive. It also only takes a few minutes to set up. It gives you full coverage with almost zero friction to get going, so it’s what I recommend to anyone who needs to get something up and running.
Also, I know it’s really geeky, but Backblaze subscriptions genuinely make a great holiday gift, and they have a gifting option too.
(I didn’t receive any compensation for this endorsement. I recommend it because it’s a genuinely great product. But if Backblaze decides to send a check I will cash it for sure).
Getting Started with Local Backups
After you have Backblaze up and running, local backups are the next best option for a couple of reasons:
- Local backups are the fastest and easiest when you need to restore
- Aside from the storage device costs, local backups are the most economical
- Local backups are the easiest to control from a privacy and security standpoint
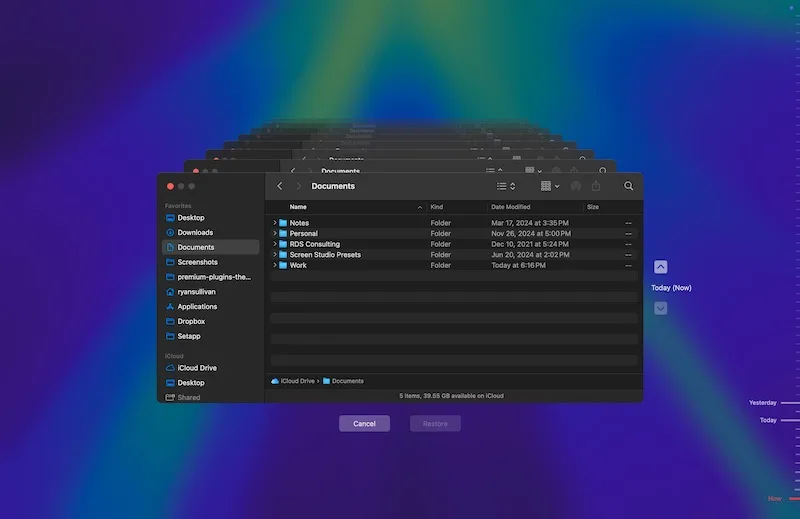
Time Machine
I have my Time Machine backups set to run hourly. It’s a completely set-and-forget solution. It creates incremental backups of all of your files. However, and this is an extremely important however, Time Machine does not create a bootable clone of your machine.
In other words, if your computer fails for some reason, you’ll still have to go through the hassle of reinstalling your operating system and reconfiguring all of your OS and application settings.
Carbon Copy Cloner
Carbon Copy Cloner is another Mac backup utility that’s more advanced than Time Machine and gives a lot more options for backing up your computer.
Unlike Time Machine, CCC will backup your entire computer if you want it to. It will also back up individual files or folders, and will run the backups at whatever frequency you’d like. It has all sorts of advanced configuration settings.
I have a very basic weekly backup schedule using CCC. It backs up my entire computer, but only the files that have changed in the last 7 days, so backups run quickly.
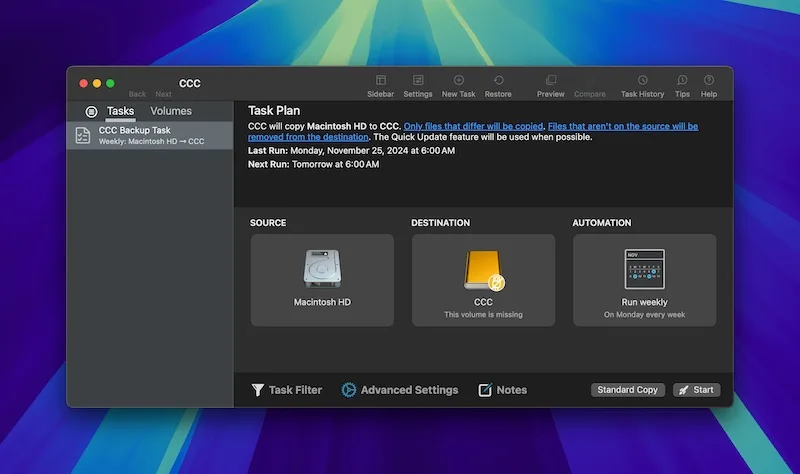
Important note: You cannot use the same external storage for Time Machine and Carbon Copy Cloner, which is why I have two external drives.
I leave the Time Machine drive connected to my computer all the time. Then once a week on Sunday night I eject the Time Machine disk and connect the CCC disk. I leave the CCC disk connected for 8-10 hours, which is long enough for the CCC backups to also be copied to Backblaze. Remember how Backblaze backs up all of your external storage as well? Now you have backups for your backups!
Additional note: The disk rotation is only necessary if you’re limited on port space like I am. You could easily leave both disks connected all the time.
Here are a couple of more quick tips related to local backups:
- I strongly recommend enabling disk encryption on external media so that even if the disks are stolen, the data will be inaccessible.
- Buy an additional set of physical external disks and rotate them to a remote location (bank safety deposit box, friend’s house, etc) on a monthly or quarterly basis.
- Solid state drives (SSDs) are more reliable long-term.
- USB 3.0 or Thunderbolt connections allow for faster backups and restores.
Backing up to the Cloud
I separate my Cloud backups into two separate types — files and photos.
Backing up Photos to Cloud Services
My photography source of truth for photo storage is the iCloud Photos. This library is automatically backed up to iCloud, Backblaze, Time Machine, and CCC from my Mac.
Additionally, these photos are backed up to Amazon Photos, Google Photos, and Dropbox from my iPhone via their respective apps.
After initial setup, your photos will backup to these services automatically. However, and this is a big however, due to background process restrictions on iPhone, these apps will require you to leave their respective apps open occasionally to sync all of your photos.
I don’t have a specific regimen for this, but every once in a while (probably about once a month) I’ll open each app before I go to bed so that the photos upload while my phone is charging on its dock.
Backing up Files to Cloud Services
Mainly I let these apps work in the background of my Mac and do what they do. But for my most important files, I have one extra special Hazel workflow. If there are files or directories that I want to make sure are protected, I add an important tag to them.
Then my Hazel workflow automatically copies them to a corresponding Google Drive, iCloud Drive, and Dropbox directory instantly. Here’s a quick preview of how I have that rule set up:
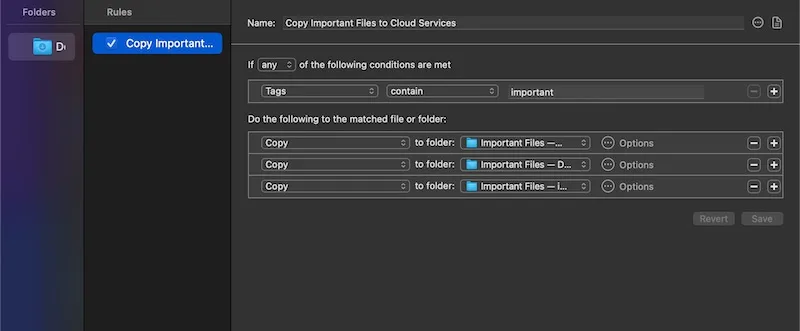
Pretty slick, right?
Miscellaneous Notes on Backups and a Few Additional Tricks
I understand that this will likely seem like overkill to most of you, and it likely is. If you’re keeping score at home, I have files backed up in six different locations and photos backed up in seven different locations, none of which include my actual computer hard drive.
It’s a relatively low price to pay for true peace of mind. I know that even under the most extreme and dire circumstances, my digital legacy will remain intact. On another day I’ll write about what it takes to restore these backups if something does go wrong, and how to do everything securely.
To wrap things up, here are a few final things I do to keep files backed up and protected:
- I back up my iPhone to my Mac every week
- I keep full resolution photos stored locally on my phone (I know Apple says this isn’t necessary, but again, it makes me feel better, so I do it)
- I test and verify backups every 3 months
How about you? What does your backup routine look like? Any thoughts you have about my process or gaps you see? If you need help getting started with any of this, let me know in the comments!